By adding a second sidebar to blogger (blogspot) your blog will look more professional and you will have more space for your gadgets and widgets. Follow the bellow steps with attention , and first of all backup your template.
1. Go to your Blogger dashboard
2. Layout
3. Edit HTML
4. Find the sidebar-wrapper code, it looks like this:
#sidebar-wrapper { width: 220px; float: $endSide; word-wrap: break-word; /* fix
for long text breaking sidebar float in IE
*/ overflow: hidden; /* fix for
long non-text content breaking IE
sidebar float */}
5. Add the following code right after it:
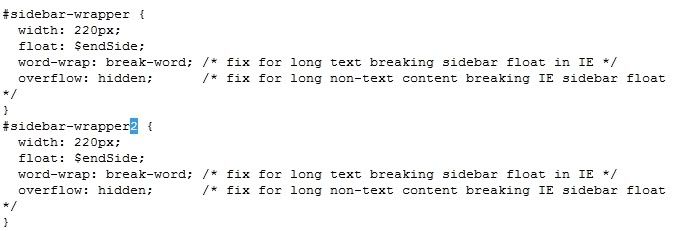
#sidebar-wrapper2 { width: 220px; float: $endSide; word-wrap: break-word; /* fix
for long text breaking sidebar float in IE
*/ overflow: hidden; /* fix for
long non-text content breaking IE
sidebar float */}
So it will look like this:

6. Find the following code:
<div id='sidebar-wrapper'>
<b:section class='sidebar'
id='sidebar' preferred='yes'>
<b:widget id='BlogList1'
locked='false' title='My Blog List' type='BlogList'/>
<b:widget
id='Label1' locked='false' title='Labels'
type='Label'/>
<b:widget id='Followers1' locked='false'
title='Followers' type='Followers'/>
<b:widget
id='BlogArchive1' locked='false' title='Blog Archive'
type='BlogArchive'/>
<b:widget id='Profile1'
locked='false'
title='About Me'
type='Profile'/>
</b:section>
</div>
Note: Look for the piece of code what i have marked in red, the middle of
the code is containig the first sidebar gadgets
7. Paste after it the following code:
the code is containig the first sidebar gadgets
7. Paste after it the following code:
<div id='sidebar-wrapper2'>
<b:section
class='sidebar' id='sidebar2' preferred='yes'>
</b:section>
</div>
It will look like this, but you have other gadgets: 

8. Now edit the size of the template:
Find the following code :
Find the following code :
#sidebar-wrapper {
width: 220px;
float: $endSide;
word-wrap:
break-word; /* fix for long text breaking sidebar float in IE */
overflow:
hidden; /* fix for long non-text content breaking IE sidebar float
*/
}
#sidebar-wrapper2 {
width: 220px;
float:
$endSide;
word-wrap: break-word; /* fix for long text breaking sidebar float
in IE */
overflow: hidden; /* fix for long non-text content breaking IE
sidebar float */
}
The bold numbers are the size of the 2 sidebars , this is the standard
size , but you can change them.
size , but you can change them.
Note: If you have the size of the sidebars we need to calculate:
This is the size of the blog:
#outer-wrapper {
width: 660px;
margin:0 auto;
padding:10px;
text-align:$startSide;
font: $bodyfont;
}
This is the size of the header:
#header-wrapper {
width:660px;
margin:0 auto 10px;
border:1px solid $bordercolor;
}
And this is the size of the posts:
#main-wrapper {
width: 410px;
float: $startSide;
word-wrap: break-word; /* fix for long text breaking sidebar float in IE */
overflow: hidden; /* fix for long non-text content breaking IE sidebar float */
}
These are the default sizes, now lets change them.
The posts body size is 410 , the size of a single sidebar is 220.The entire blog size is 660, the header is the same.
outer-wrapper = 660
main-wrapper = 410
sidebar-wrapper = 220
paddings and borders = 660 - (410 + 220)
Now add the second sidebar:
outer-wrapper = 410 + 220 + 220 + 30 = 880
So edit the outer and the header wrapper to 880
If you use other numbers recalculate it, it`s simple.
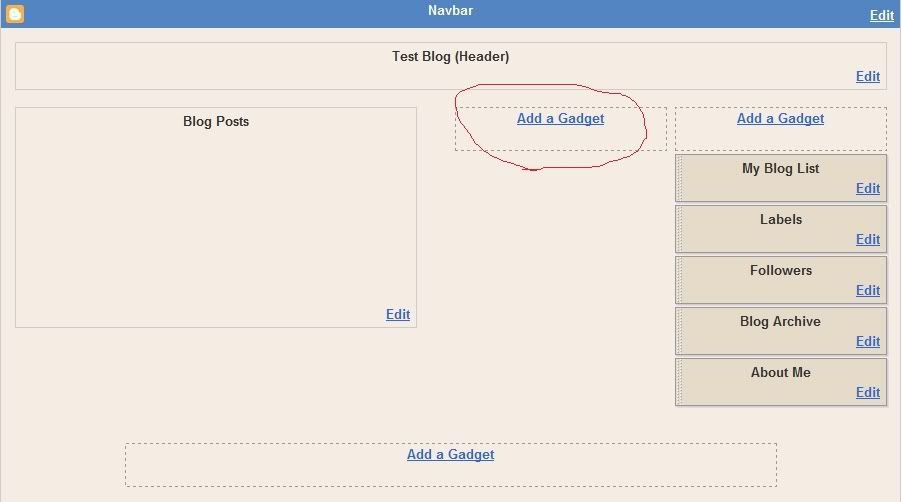
9. Save your template and go to Page Elements If you have followed all the steps it will look like in this picture.
10. Now just add some gadgets and please link to us! (Link to us with a text link or use the image code from my sidebar :D thx for your support)
related post:
- Adding The Sticky Floating Widget Next To Blogger Posts (1)
- Advanced Search Techniques for Google Search Optimization (1)
- Blogger Sticky Floating Widget (1)
- Hot girls photos (1)
- seo (3)
- SEO sitemap Tips for Blogger (blogspot) (10)
- SEO Tutorial - Search Engine Optimization Tips (2)
- SEO- off page (6)
- SEO- on page (4)
- SEO-tools (1)
কোন মন্তব্য নেই:
একটি মন্তব্য পোস্ট করুন